Différences entre versions de « Fraxion dispatch »
| Ligne 109 : | Ligne 109 : | ||
[[Fichier:F2.png|Bouton F2]] : Call Pickup Screen: Used to view the list of recent phone numbers, approximately the last 10. Dispatch: Used to view the details of a call waiting in the dispatch screen. | [[Fichier:F2.png|Bouton F2]] : Call Pickup Screen: Used to view the list of recent phone numbers, approximately the last 10. Dispatch: Used to view the details of a call waiting in the dispatch screen. | ||
<br clear="all"> | <br clear="all"> | ||
| − | [[Fichier:F3.png|Bouton F3]] : | + | [[Fichier:F3.png|Bouton F3]] : Call Screen: None. Dispatch: Usually used in the very busy periods of the morning, late afternoon and the one of 3 am. This activates the rush mode. Specifically it makes your calls change zones. Instead of having 3 zones or searching for a car there will be only one. Your cars will avoid driving several kilometers when there are several calls waiting. Depending on the company and the number of cars present, this can be activated with three, four, five or more calls on hold. |
<br clear="all"> | <br clear="all"> | ||
[[Fichier:F4_Exemple1.PNG|vignette|Image F4 Options Personnalisées]] | [[Fichier:F4_Exemple1.PNG|vignette|Image F4 Options Personnalisées]] | ||
| − | [[Fichier:F4.png|Bouton F4]] : | + | [[Fichier:F4.png|Bouton F4]] : Both sides have the same function. One time F4 will take you back to your personal options. Twice in a row will log you out of the program. |
<br clear="all"> | <br clear="all"> | ||
[[Fichier:F5_exemple1.PNG|vignette|Image F5 Recherche d'Appel]] | [[Fichier:F5_exemple1.PNG|vignette|Image F5 Recherche d'Appel]] | ||
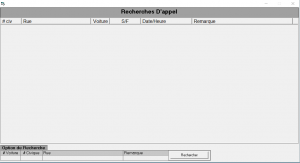
| − | [[Fichier:F5.png|Bouton F5]] : | + | [[Fichier:F5.png|Bouton F5]] : Call search menu. You can search by car, address, suitable transport numbers or remarks and comments. You can also see all calls of the day and more by left-clicking on date/time and left-clicking on search. See also [[Call information]] |
<br clear="all"> | <br clear="all"> | ||
| − | [[Fichier:F6.png|Bouton F6]] : | + | [[Fichier:F6.png|Bouton F6]] : In the call screen, F6 is used to send a call. You can also use enter twice. In some companies the F6 in the dispatch screen will open the accounts that the company they serve. |
<br clear="all"> | <br clear="all"> | ||
| − | [[Fichier:F7.png|Bouton F7]] : | + | [[Fichier:F7.png|Bouton F7]] : When a customer calls back to find out where his cab is, the F7 key is used to generate a callback. The call will appear in the dispatch screen in yellow. When the customer uses the same address shortly after the first call for a second person, it is best to use the regular formula and specify that it is for another person. |
<br clear="all"> | <br clear="all"> | ||
| − | [[Fichier:F8.png|Bouton F8]] : | + | [[Fichier:F8.png|Bouton F8]] : Canceling a call. When a customer calls back to cancel his cab request, the operator who presses F8 will send the call to the dispatcher's screen and will be in red meaning that it is cancelled and to notify the car by sending the cancellation in his tablet. *F9: priority call. The call can be sent to the dispatch screen as a priority call with different delays depending on the priority of the call and it will be green on the dispatch screen. You can also display the car display board with F9 if you are in the dispatch screen. |
<br clear="all"> | <br clear="all"> | ||
[[Fichier:Appel_Prioritaire.png|vignette|Image F9 Appel Prioritaire]] | [[Fichier:Appel_Prioritaire.png|vignette|Image F9 Appel Prioritaire]] | ||
| − | [[Fichier:F9.png|Bouton F9]] : | + | [[Fichier:F9.png|Bouton F9]] : This is used to activate the hook table via the dispatch screen when it is closed. It is also used in some companies to put a priority on a call using a table of predefined priorities. Ex. Reservations for such and such a place according to the company's contracts. |
<br clear="all"> | <br clear="all"> | ||
| − | [[Fichier:F10.png|Bouton F10]] : | + | [[Fichier:F10.png|Bouton F10]] : It is used to change the screen either from call taking to dispatch or vice versa. |
<br clear="all"> | <br clear="all"> | ||
[[Fichier:F11_exemple1.jpg|vignette|Image F11 Message Véhicule]] | [[Fichier:F11_exemple1.jpg|vignette|Image F11 Message Véhicule]] | ||
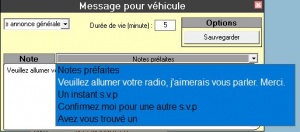
| − | [[Fichier:F11.png|Bouton F11]] : | + | [[Fichier:F11.png|Bouton F11]] : Send a message to a specific driver. Is done on both screens. |
<br clear="all"> | <br clear="all"> | ||
[[Fichier:F12_exemple1.PNG|vignette|Image F12 Menu Options]] | [[Fichier:F12_exemple1.PNG|vignette|Image F12 Menu Options]] | ||
[[Fichier:Message_Pour_Repartiteur.png|vignette|Image F12 Option de messages]] | [[Fichier:Message_Pour_Repartiteur.png|vignette|Image F12 Option de messages]] | ||
| − | [[Fichier:F12.png|Bouton F12]] : | + | [[Fichier:F12.png|Bouton F12]] : Drop down menu with 16 different options. You can find everything related to adapted transportation. For those who are with Moctel your infotel is there too. For those who work with access and Giro, your task manager is also there. There is also an option that is used during rush periods to send messages between employees to communicate information between them. |
<br clear="all"> | <br clear="all"> | ||
Version du 8 novembre 2021 à 12:45
| Ce guide d'utilisation est un survol des différentes fonctionnalités du système de répartition de Fraxion. |
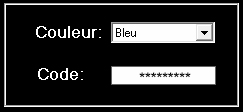
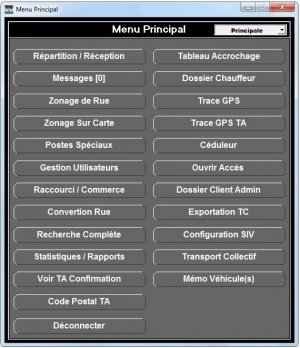
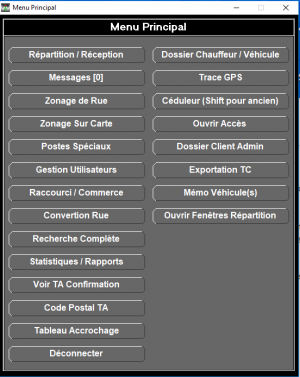
Start Fraxion DispatchTo start the software, click on the "Fractional Dispatch" icon, which is normally located on the desktop of the computer. If the icon does not appear on the desktop, you can find it in Windows Explorer: C:\Program Files (x86)\Repartition Fraxion.exe Right-click on the File Distribution Fraxion.exe and select "Pin to Taskbar. User AuthenticationYou can select the color of the dispatch screen that you prefer. Generally, blue is less tiring for the eyes. Users can be created in the User management module. This is also where users can change their passwords. Passwords can be composed of letters, numbers and are case sensitive. There is no minimum or maximum number of characters to form a password. Translated with www.DeepL.com/Translator (free version) Menu principalLe menu principal est le premier écran lorsqu'un utilisateur entre son code. Ce menu peut varier d'un utilisateur à l'autre et d'une compagnie à l'autre, selon le secteur d'activité ou les besoins de celle-ci. Dans la capture d'écran ci-contre, tous les cas de figure sont présentés. Des boutons peuvent être ajoutés ou retirés, selon les accès permis aux utilisateurs. Voir la page Gestion utilisateurs.
Écran de répartition des appelsFichier:Ecran Répartition des appels.jpg Cliquez sur l'image pour l'agrandir. Description of the elements
5.1 Colored dots. The colored dots inside the call indicate the status of the call.
Écran de réception des appelsLa réception des appels est l'outil avec lequel vous prendrez les appels. Il est très détaillé afin d'intégrer le maximum d'information possible. Si désiré, on peut également utilisé seulement une partie des cases. Vous verrez au fur et à mesure les cases obligatoires et celles qui sont complémentaires. Voici une capture d'écran de la page réception des appels. Au début de l'écran, l'entête, vous avez les informations de base que vous retrouverez des deux cotés c'est à dire du coté réception et répartition.
Ensuite vous avez la partie centrale.
1-Ces lignes sont obligatoire. Les autres sont facultatives.
|

